What each Nailbot light ring color means.Updated 6 months ago
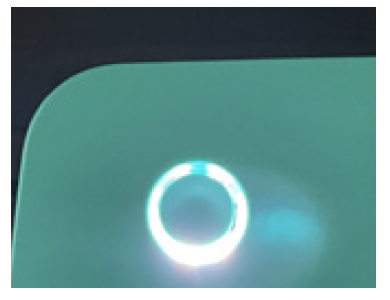
WHITE LIGHT: Nailbot is on and working. This white light indicates that everything is running smoothly and correctly.
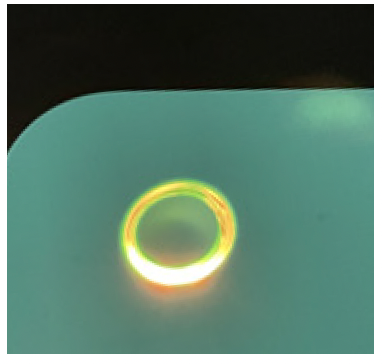
ORANGE LIGHT: This could be due to a missing Ink Cartridge, an incompatible Ink Cartridge that has been inserted into Nailbot, or an obstruction in the print area.
Step 1. Check that there are no objects, hands, or fingers in the way of the carriage. If so, remove them.
Step 2. If the light ring returns to white, continue usage as normal. If the light ring turns red, refer to the next section on rebooting Nailbot. If the light ring remains orange, continue to Step 3.
Step 3. Power off Nailbot and pull the Carriage toward the center of Nailbot. Stop to the right of the Finger Guide (refer to page 4).
Step 4. If an Ink Cartridge is missing, insert a Nailbot Ink Cartridge.
Step 5. If an Ink Cartridge has been inserted, remove the Ink Cartridge and check that it is a Nailbot Ink Cartridge. Only Nailbot Ink Cartridges are compatible with the Nailbot System - others do NOT work.
Step 6. If a Nailbot Ink Cartridge was inserted, remove it from the Carriage and check that the clear clip has been removed. Reinsert it into the Carriage, making sure it clicks into place (see page 4).
Step 7. Gently push the Carriage back into place once a compatible Nailbot Ink Cartridge has been inserted.
Step 8. Power on Nailbot. Check that the light ring is white, then continue usage.
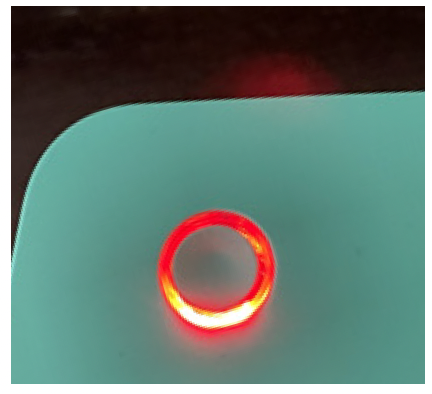
RED LIGHT: User Intervention Required - Reboot Nailbot Sequence
Step 1. Check that there are no objects, hands, or fingers in the way of the carriage. If so, remove them.
Step 2. Power off Nailbot and unplug the Power Tip from the Nailbot.
Step 3. Wait 10 seconds, then replug the Power Tip into the Nailbot Power Jack.
Step 4. Power on Nailbot. If the light ring is white, continue usage as normal. If the light ring is still red, repeat steps 1-4.